Transform preloved furniture into beautiful bespoke pieces
By Dina Ansari
Thinking of revamping a room? Are you looking for simple and easy ideas to add zest to your interiors and take it from drab to fab? And it needs to be a decorating project that won’t break the bank?
Here I would like to share with you DIY room décor hacks that might help you find your own inspiration!
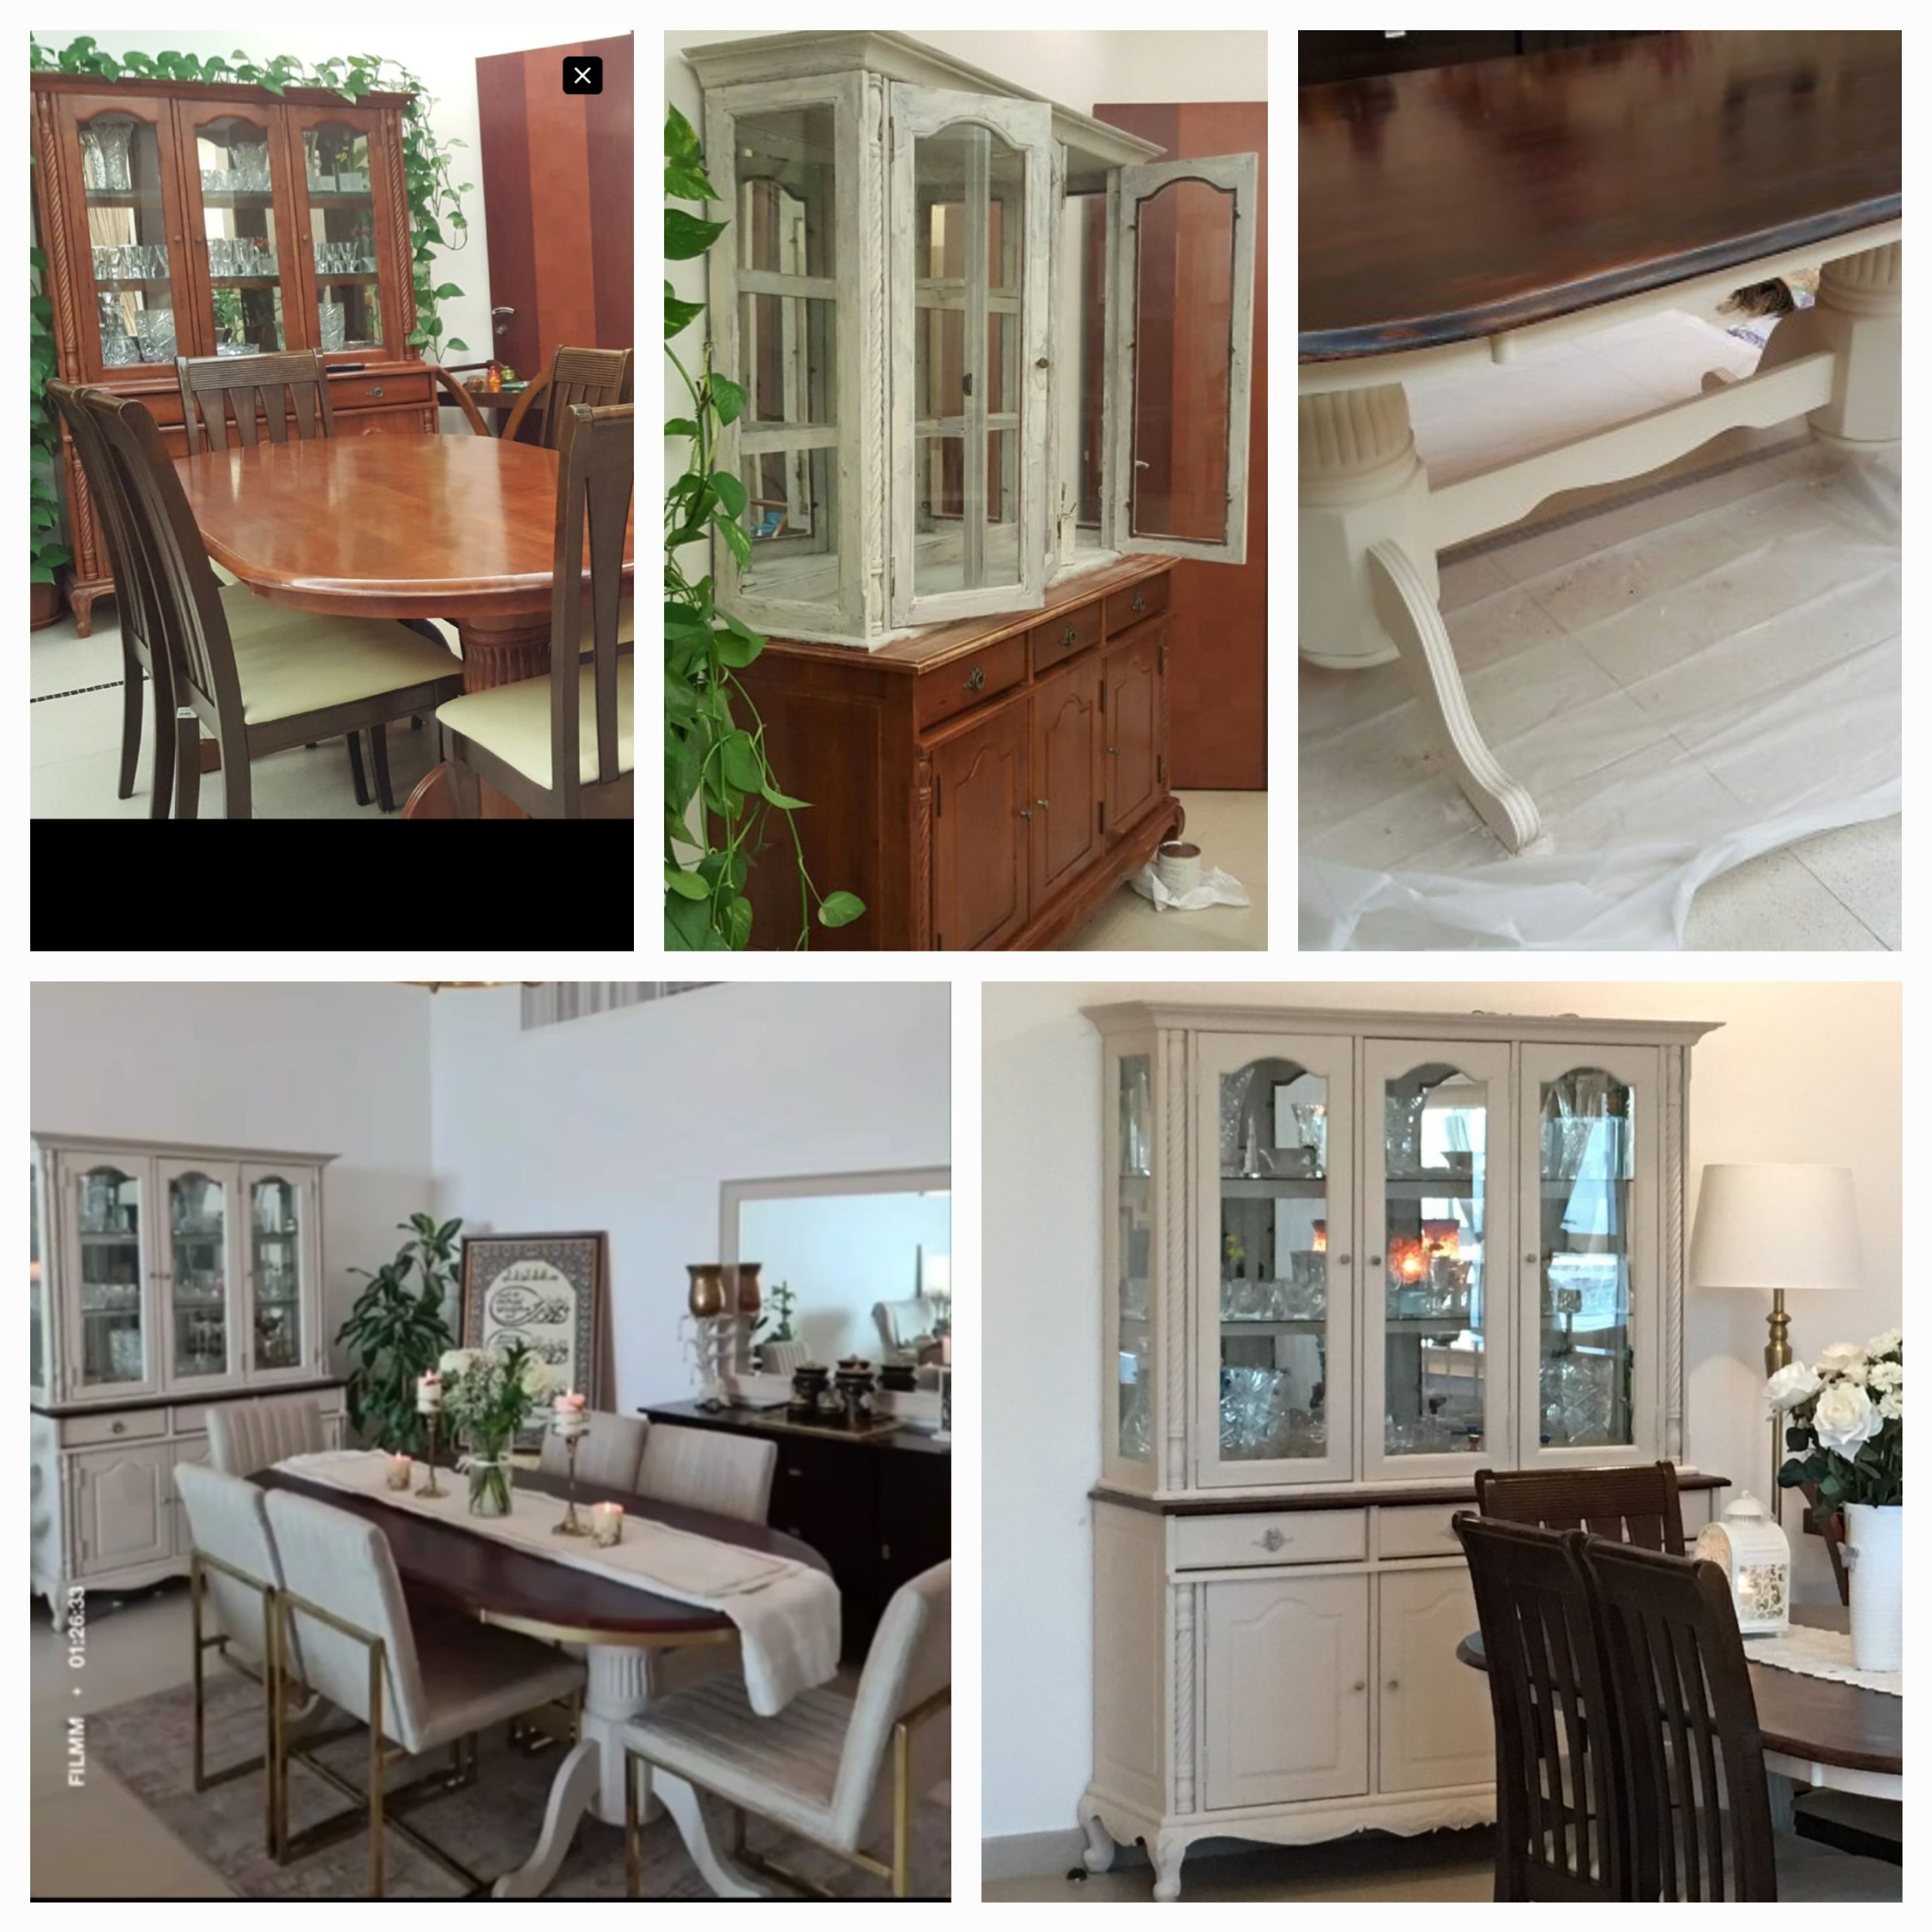
I have always been captivated by time-worn age old furniture pieces that have value, and have their own stories to tell. I wanted to open an eclectic living space blending old and new; basically, a vintage modern style makeover. This was my first interior design project from my portfolio, and it was an interesting, challenging and yes, very rewarding experience!
Refresh, Revive and Rejuvenate!!
With some effort and time you can definitely transform great furniture! I will talk more about how I updated the space I had, keeping the existing furniture (basically dining table, hutch and TV entertainment unit) while restoring it to a shabby chic vintage look and breathing new life into it. I discovered that the antique feature furniture can be upgraded creating a designer look for close to nothing.
Sand, Stain and Finish
This complete process took about two weeks as I had many furniture pieces to prepare..
Prep Work: The first step is to prep your furniture, basically sanding and cleaning it. My hubby is very particular about my taking every precaution while sanding and staining. So I had my dust mask and gloves on. You can even get protective goggles for your safety. Here I pause to remind you to read the product warnings and directions before taking up any project.
We first started sanding the wood surface before staining it using medium-grit sandpaper (#100). I would recommend that you finalize the sanding process using a finer-grit sandpaper (#220), and that’s what I used to lightly sand the table top.
Roughing up the surface meant removing all the gloss. I felt the sanding was pretty simple because I had my sons and nephew helping me achieve the desired result, with their light even strokes along the grain of the wood. After all the sanding, I used a tack cloth to wipe away the dust ensuring there was no debris left on the surface.
Wood Stain and Finish:
Next step was the staining. Polyshades are simple to use, and I painted a first coat of Polyshade Minwax
(Mission Oak colour) using a bristle brush. You can also use a foam brush or a roller – absolutely your choice. I did two coats for a darker and richer tone, letting it dry completely and sanding very lightly between coats. If you are looking in your project for just a fresh look then one coat could be enough. Brush lightly along the grains, apply thin even coats with long strokes over the entire length of the table. Let each coat to dry for six hours or more. I wanted to change the colour of the table top but still have the wood grain show through. In order to enhance its beauty and protect the wood I used a top coat of Minwax clear finish after the stain had dried.

Chalk paint
I stained the table top, and for the table base, the TV unit and the hutch I used one step furniture chalk paint to get the vintage charm restored look. There was no need for stripping, sanding or priming.
I used the amazing chalk paint Amy Howard (Linen color) to give it a shabby chic style . After three thin coats I got the perfect smooth finish. I added a light distressed look by using the Amy Howard antique wax on all the surface, using a little more on the table edges, the legs, corners and knobs to reveal more wear and tear areas.
My favourite way of adding gold highlights was by using a metallic gold paint from Levis, brushed on the dining table’s trim using an artist’s brush for a subtle touch of bling. And for a complete new look of the dining table I added a new set of contemporary dining chairs as a quick and cost-effective way of freshening up the dining room without undertaking expensive renovations. Neutral colour rich fabric upholstered dining chairs beautifully accentuated the distinctive gold metal legs, and the eclectic style shabby chic vintage look radiated a contemporary warm elements space.
Important Notes:
Its very important to note that the final stained product emits fumes for a few days during the process of evaporation and drying. If working indoors, ensure there’s adequate ventilation. Keep all the windows open for cross ventilation or use fans to get rid of the fumes. A two system fan draws fresh air into the room, while the other blows fumes out of the room, and if you can use an air purifier after the job.
All working tips are on the websites of the brands I mentioned. I did a lot of research and collected a lot of info on the product before I took up the job of doing it.
All the material I used is available at ACE, but you may find it in other hardware stores as well. You might not find Amy Howards chalk paint readily available, but hardware store staff are usually able to suggest similar alternatives. I opted for a close shade from another brand called Restoleum white chalk paint (mixed with a tint of color Magnolia) for the perfect tone
I hope I haven’t missed out on any details, but you’ll pick things up as you get going. There will be a lot of flops but all the learning you do is part of the fun. Whether you call it revamping; repurposing; reclaiming; reimagining or salvaging, it doesn’t matter; it’s all upcycling – the process of giving old furniture a new lease of life. A little imagination and a few simple steps to repurpose old to new – saving money and most importantly saving waste.
Check out my work in the photos. The results got me a lot of appreciation and I hope you like them too.
I hope I’ve inspired you to work on your project.